I just stumbled across these great DIY Pantone Chip magnets, and I'm LOVING them.
For a full description of how to make them yourself, click here.
Here's a closer look:
For a fun variation, how about mini polaroid pictures?
Kudos (and photo credits) go to How About Orange for this great DIY idea!
Wednesday, May 25, 2011
Thursday, May 19, 2011
DIY Magazine Bow
I'm a last-minute kinda gal, and gifts are no exception. I usually find myself wrapping my gift minutes before leaving for a party. So when I stumbled across these sweet bows made from magazine pages, I did a double-take. Not only are they a great way to get rid of that ever-growing stack of magazines, but they use things you have on hand, and seem to be easy enough to whip up a chic bow when you can't find just the right one.
I love the idea of using old newspaper or old phone book pages for your wrapping paper
and topping it with a shot of color.

What you'll need:
Cut a magazine page lengthwise into nine strips, each approx. 3/4" wide.
Leave three of the strips full length. Cut 1" off three of the strips.
Cut two inches off 2 of the strips.
Cut the last strip down to 3 1/2" long.
Twist each strip to form a loop at both ends and staple it in the center.
Shape the last (short) strip into a circle and secure it with a glue dot.
Layer the three longest pieces on top of each other, spacing them evenly
and securing each with a glue dot. Add the next two groups of pieces,
doing the same. And finally, stick the loop into the center. Voila!
(Credits: How About Orange)
And for some fun variations, how about using a map (great for a going away gift)
or felt (adorable for a baby shower)? This would also be a great way to top a card
and make it feel a bit more like a gift.
Happy gifting!
I love the idea of using old newspaper or old phone book pages for your wrapping paper
and topping it with a shot of color.

What you'll need:
- A single sheet of paper from a magazine, newspaper, or map.
- Scissors
- Stapler (glue dots or double-sided tape would also work).
Cut a magazine page lengthwise into nine strips, each approx. 3/4" wide.
Leave three of the strips full length. Cut 1" off three of the strips.
Cut two inches off 2 of the strips.
Cut the last strip down to 3 1/2" long.
Twist each strip to form a loop at both ends and staple it in the center.
Shape the last (short) strip into a circle and secure it with a glue dot.
Layer the three longest pieces on top of each other, spacing them evenly
and securing each with a glue dot. Add the next two groups of pieces,
doing the same. And finally, stick the loop into the center. Voila!
(Credits: How About Orange)
And for some fun variations, how about using a map (great for a going away gift)
or felt (adorable for a baby shower)? This would also be a great way to top a card
and make it feel a bit more like a gift.
Happy gifting!
Tuesday, May 10, 2011
shifting gears
I'm in love with this silkscreened poster by Allan Peters, who created it for a poster show for bike lovers. The artist explains, "When I got this project, my wife and I had just found out that we were going to have a baby and so I wanted to do something that mixed that joy with my joy of biking." Read more about it here.
Not only are the colors DELISH, but the concept and execution are perfect. A labor of love well done.
Wednesday, May 4, 2011
i scream, you scream
When we purchased our house in 2008, we failed to realize the convenience (and danger) of having an icecream shop literally at the entrance to our subdivision. With chocolate peanut butter icecream at an arm's length, let's just say that we became frequent customers. All in the name of "quality family time," of course. So when we hopped on our bikes for the first time this spring to make our first annual trip to Scoopy's, our two-year-old was dismayed to see a "FOR SALE" sign in the door. Crushed, in fact. Okay, it was mom who was crushed. But the little man was a little disappointed too.
So in honor of Scoopy's, and in hopes that someone will buy the store and open its doors again before the first sound of summer crickets, I share this tasty packaging for Honey & Mackie's by Wink. Don't you just want to lick them? (the icecream, that is...)
I recently had the pleasure of doing some brand consultation and development for a client that led to my researching vintage typography and graphic design (read more about it here). I loved poring over the charming, whimsical details in 50's an 60's advertising and literature. Rather than recreating what's already been done though, the true challenge is reinterpreting it to be fresh and relevant today. Wink has done just that in their packaging below.
So if anyone's looking to venture out as an entrepreneur, might I suggest opening a Honey & Mackie's in Canton, Michigan? You'll have at least three faithful customers to help get your business off the ground!

So in honor of Scoopy's, and in hopes that someone will buy the store and open its doors again before the first sound of summer crickets, I share this tasty packaging for Honey & Mackie's by Wink. Don't you just want to lick them? (the icecream, that is...)
I recently had the pleasure of doing some brand consultation and development for a client that led to my researching vintage typography and graphic design (read more about it here). I loved poring over the charming, whimsical details in 50's an 60's advertising and literature. Rather than recreating what's already been done though, the true challenge is reinterpreting it to be fresh and relevant today. Wink has done just that in their packaging below.
So if anyone's looking to venture out as an entrepreneur, might I suggest opening a Honey & Mackie's in Canton, Michigan? You'll have at least three faithful customers to help get your business off the ground!

Wednesday, April 27, 2011
facebook circa 1960
The other day, I referred to a DVD as a "video" and immediately felt a decade older. In honor of that, I share these vintage-inspired "ads" for social media. Read more about them here. I wonder what the next generation's Facebook will be... and whether I'll catch myself accidentally calling it Facebook (followed by an eyeball roll by my son).
Enjoy!

Credits: Ricky Salsberry of The Donut Project
Enjoy!

Credits: Ricky Salsberry of The Donut Project
Sunday, April 24, 2011
sunburst obsession
I have a confession. I've recently become obsessed with starburst mirrors and wall art. Okay, maybe the word "obsession" is a bit strong, but suffice it to say that it's caused me to eye every bed, couch and table in my house where a perfectly centered sunburst might be just the finishing touch that it needs.
Case in point: a few years ago, I stumbled across this beauty, which spans a gorgeous four feet across the papaya-colored wall in my kitchen (please excuse the poor photo quality, ugly oak cabinets, and photographer's reflection). Two years later, this thing still makes me feel happy every time I look at it. Kind of like my son. Er, perhaps that's not the right comparison. In any case, I love it so much that it inspired the holiday cards I sent to my clients last year.
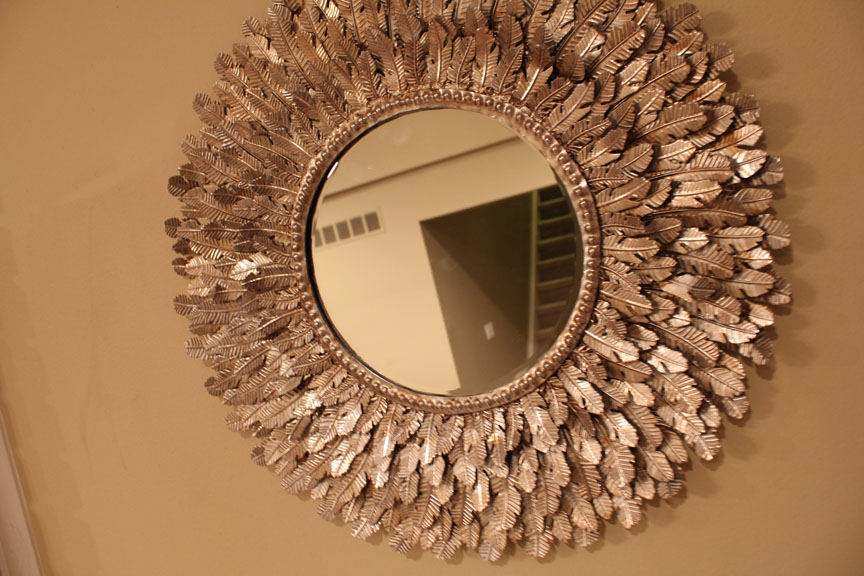
Then came this leafy champagne-colored treasure, which I discovered last summer during a trip to Traverse City. At $175, it's pretty much the most expensive thing I've ever bought for a wall... but I had seen it months earlier and when I returned, it caught my eye again. Needless to say I snatched up, felt a wee bit guilty, but quickly got over it.
Then came my more recent attempt to "adultify" the playroom in our lower level (translation: basement). That's right... adultify. You'll notice that this photo is strategically cropping out the train table and baskets of toys on either side.
Now that I've proven my case, you can now understand why I was so thrilled to come across these fun DIY projects that involved making a sunburst mirror... out of rulers! See the full project here on Design Sponge! Office supplies + groovy home décore = pure genius in my books. And no, I can't take credit for this mirror.
Another clever iteration is this wooden ruler mirror made out of wooden rulers (25 cents ea) and shish kebab skewers.
And perhaps my favorite for this spring due to the crisp, fresh feel of white against a colored wall (as well as the fact that this is made out of PAPER!) is the one shown below. Click here for complete DIY instructions by Nesting Place.
Three tips for using a sunburst mirror or wall art in your décor:
1. Think balance. These work best when centered over a piece of furniture such as a console table, a fireplace, or a bed. When hanging, consider also the distance between the circle and the piece of furniture. Many people hang their art too high on the wall. The center of your circle should be at eye level for the average person, unless of course you are positioning above a fireplace or higher piece of furniture. The mirror below could have been hung about 6" higher. Still, it's a gorgeous example of how a few unique pieces within a neutral palette can give a room character and a little "glam." Love.
2. Consider proportion and visual "weight." The mirror below feels proportionate to the room size, and fills the space over the fireplace well. It's also reflective, which gives it a lighter "visual weight" compared to the mirror over the bed (shown above). So even though it's a large piece, it doesn't feel too heavy in the room. Something with mirrored or metallic "spokes" helps it feel light and airy despite its size. Or you could also paint a darker frame white, as shown in the third picture.
Case in point: a few years ago, I stumbled across this beauty, which spans a gorgeous four feet across the papaya-colored wall in my kitchen (please excuse the poor photo quality, ugly oak cabinets, and photographer's reflection). Two years later, this thing still makes me feel happy every time I look at it. Kind of like my son. Er, perhaps that's not the right comparison. In any case, I love it so much that it inspired the holiday cards I sent to my clients last year.
| Add caption |
Then came this leafy champagne-colored treasure, which I discovered last summer during a trip to Traverse City. At $175, it's pretty much the most expensive thing I've ever bought for a wall... but I had seen it months earlier and when I returned, it caught my eye again. Needless to say I snatched up, felt a wee bit guilty, but quickly got over it.
Then came my more recent attempt to "adultify" the playroom in our lower level (translation: basement). That's right... adultify. You'll notice that this photo is strategically cropping out the train table and baskets of toys on either side.
Now that I've proven my case, you can now understand why I was so thrilled to come across these fun DIY projects that involved making a sunburst mirror... out of rulers! See the full project here on Design Sponge! Office supplies + groovy home décore = pure genius in my books. And no, I can't take credit for this mirror.
Another clever iteration is this wooden ruler mirror made out of wooden rulers (25 cents ea) and shish kebab skewers.
And perhaps my favorite for this spring due to the crisp, fresh feel of white against a colored wall (as well as the fact that this is made out of PAPER!) is the one shown below. Click here for complete DIY instructions by Nesting Place.
Three tips for using a sunburst mirror or wall art in your décor:
1. Think balance. These work best when centered over a piece of furniture such as a console table, a fireplace, or a bed. When hanging, consider also the distance between the circle and the piece of furniture. Many people hang their art too high on the wall. The center of your circle should be at eye level for the average person, unless of course you are positioning above a fireplace or higher piece of furniture. The mirror below could have been hung about 6" higher. Still, it's a gorgeous example of how a few unique pieces within a neutral palette can give a room character and a little "glam." Love.
2. Consider proportion and visual "weight." The mirror below feels proportionate to the room size, and fills the space over the fireplace well. It's also reflective, which gives it a lighter "visual weight" compared to the mirror over the bed (shown above). So even though it's a large piece, it doesn't feel too heavy in the room. Something with mirrored or metallic "spokes" helps it feel light and airy despite its size. Or you could also paint a darker frame white, as shown in the third picture.
3. Have fun. Break the rules a little. Display a group of them together on a larger wall. Similar finishes and the repeated circular shape helps to tie this collection together. You could spraypaint a bunch of them white, or add some whimsy to a child's room by painting them in a few different shades of the same hue (ie. pink).
Happy sunbursting!
Wednesday, April 20, 2011
buzzkill coasters
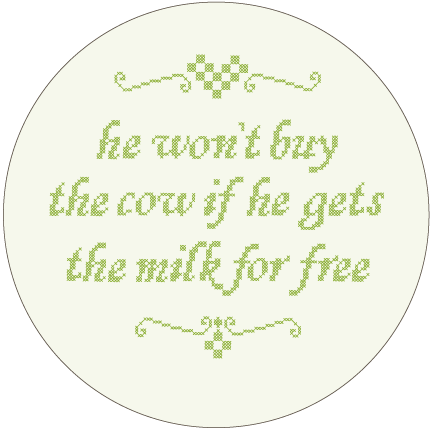
Yes, I'm horrible. No posts in nearly three weeks. I've had a ton of new projects come my way recently, and have neglected this blog. I post these in honor of upcoming family gatherings this coming Easter season. These fabulous coasters by Gilah Press seem to be in line with my MYOB cards. I absolutely love them.
Enjoy!
Enjoy!
Subscribe to:
Posts (Atom)